By Mary Ann Boysen
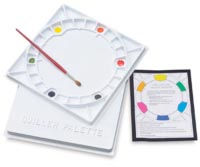
 I've used many watercolor palettes over the years. Let's not count the years, just the palettes! I highly recommend the idea of the color wheel layout. With these types of palettes, you're not randomly placing colors on a palette that have no relationship with each other. There is an instructional piece that explains exactly where to put the reds, yellows and blues, etc. Then you can begin to look at other colors that will fit in between. Great idea! I've used many watercolor palettes over the years. Let's not count the years, just the palettes! I highly recommend the idea of the color wheel layout. With these types of palettes, you're not randomly placing colors on a palette that have no relationship with each other. There is an instructional piece that explains exactly where to put the reds, yellows and blues, etc. Then you can begin to look at other colors that will fit in between. Great idea!
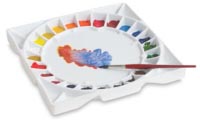
 Stephen Quiller has designed a Color Wheel Palette (above) which is good for beginners because it helps them lay out the colors. He has also designed a porcelain palette(left)that is nice for studio work. It won't slide around the table, but it's a little too heavy to take outside for plein air painting. Stephen Quiller has designed a Color Wheel Palette (above) which is good for beginners because it helps them lay out the colors. He has also designed a porcelain palette(left)that is nice for studio work. It won't slide around the table, but it's a little too heavy to take outside for plein air painting.
It's round like the color wheel palette. But the porcelain does not stain and does not repel the paint as do the plastic palettes, so mixing colors is easy.
The Ultimate in Watercolor Palettes
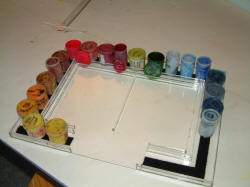
Of all the watercolor palettes out there, my personal favorite is one that you can use for both indoor and outdoor painting. It's the Possum Palette.  The great thing about this palette is the fact that each color comes in individual, sealable, cups. That way, you don't need to expose all of your colors to air when you just using three or four for a painting. It is available at DickBlick.com. You can order extra cups with covers, as shown above. I highly recommend using velcro i the bottom of the wells and the other side attached to the bottom of the cups, as they do not fit tight, and can fall out. The great thing about this palette is the fact that each color comes in individual, sealable, cups. That way, you don't need to expose all of your colors to air when you just using three or four for a painting. It is available at DickBlick.com. You can order extra cups with covers, as shown above. I highly recommend using velcro i the bottom of the wells and the other side attached to the bottom of the cups, as they do not fit tight, and can fall out.
This is where my creative brain needs to digress for a moment

To preface this, I should tell you that I actually designed one of these myself before I knew about Cheap Joe's Possum Palette. I had been in the framing business for 20 years and had the ability to meld plastic parts together, and even bend them into shapes. I had been using the old Fuji Film translucent containers for paint, as the seal without spillage.
I carefully applied Velcro to the outside edge of a sheet of Plexiglas that was about 12" x 16" in size, leaving an opening on one of the long edges for cleaning and drainage of water and color. Then the other side of the Velcro was applied to the film container bottoms so they would not fall off the Plexi sheet.
To keep the film containers separate from the mixing area, I bonded a 1/4" square rod of plastic to the Plexi sheet just on the inside edge of the Velcro strip. I also divided that section in half with another square rod of Plexi. So, I had a large divided palette with the ability to clean it easily. I also bonded another strip of square rod just inside the first one so the container lids could be held and not lost on the table somewhere.
So I took this to a workshop and everyone was commenting favorably on my invention until I knocked it to the floor and it cracked! Then someone in the room said, "Do you know that you can buy watercolor palettes on the web just like that?" Well, I rushed to my computer and looked up the Possum Palette. The only difference is that my film containers were better for making small washes and would hold more color. However, I decided that this one looked better than my homemade variety. I've used thePossum Palette ever since.
With these watercolor palettes, you can also order replacement cups and I recommend having more than the ones that are supplied with the palette. I also recommend putting Velcro in the wells and on the bottom of the cups to prevent them from flying across the floor if you drop the palette (see story above).
I do not recommend buying the carrying pouch since it doesn't come with a strap for slinging it over your shoulder; and it makes the palette difficult to manage without a strap. A less expensive solution is a plastic bag. The bag prevents any color that might escape from the containers getting into, or on, any other surface in your tote bag.
I think you will find that this is the answer to all of your needs. Paints can be re-arranged in the palette to suit your needs, or you can keep them in the original spot. Either way, do what makes sense to you in case the labels come off the cups!

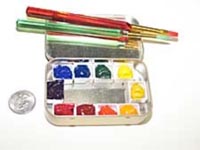
Watercolor palettes aren't always ideal for travel, but you can make your own little travel palette with an empty Altoid (the mints) container and the little plastic cups that half-pan colors come in. Just glue the cups in the container and fill them with tube colors of your choice. Several artists have done this and this photo is one made by Nita Leland, a fellow artist from Ohio.
You can also fill the container with half-pan cups and use the lid as a mixing surface. Isabey travel brushes will fit in the container. Or, you can just purchase another Altoid container for the travel brushes. This particular palette fits in a Ziploc sandwich bag. Personally, I have used a small palette that I purchased at the art supply store that has small plastic cups with lids. I've used Velcro to hold them in place just as I did with the Possum Palette. There are two slanted mixing surfaces in this palette and it is a bit larger than the Altoid container. It fits in a slightly larger plastic Ziploc bag easily.
Do your research. You may find better palettes, as some artists are always coming up with better ideas.
Related topics:
Flat Files
Brushes
Paints
Containers and Easels
Watercolor Paper
Begin painting with Watercolor Painting Tips

You can also see the 20 videos of mine on YOUTUBE.
Return to Watercolor Techniques
|

